
Mega prints
Trade show wall: the print file at final size.
For a trade show wall, your cable is rendered at the size it will be printed—as a mega print file made to your print shop's spec.
Who it's forFor marketing and the trade show team at a cable manufacturer, and their agency.
In short
- A print file to your print shop's spec
- Free proof before you order
- One file per panel, with bleed
- We deliver the file; your print shop prints
A trade show wall with a rendering of a data cable and a person next to it for scale. The image fills the whole wall.
Wall width
Height

What is a mega print for a trade show wall?
What it is
You get a print file of your cable at wall size, rendered to your print shop's spec.
We don't enlarge an existing image. The 3D model of your cable is rendered again, at exactly the pixel count your wall needs.
We deliver the file. Your print shop handles printing, shipping, and installation.
A drawing of a wall: the bleed on the outside, then the final size as a solid line, then the safe area as a dashed line with the cable inside. Vertical lines divide the wall into panels.
- Bleedprinted, then trimmed
- Final sizewhere it is trimmed
- Safe areathe cable stays inside
- Panelseach is one file
Key terms
- Final size
- The finished size of the wall without bleed. This is where the print shop cuts.
- Bleed
- A margin around the final size that is printed and then trimmed off. It is rendered as part of the image, not mirrored.
- Safe area
- The part of the final size that stays clear of the edge. The cable is always inside it.
- Panel
- A section of the wall that the print shop prints separately. Each panel is its own file.
- Proof
- A small version of the whole image with all the lines from the spec. You check it before you order.
How do I get the print file?
How it works
You enter the print shop's spec, check a free proof, and approve it.
“Mega print” is the form's name in the portal. You choose the format first: a roll-up, a banner, or a wall to measure. Everything you enter is stored in the page's address, so you can save it or share it.
The process as seven stations on one line: you enter the spec, and the portal shows pixels, panels, and price. You request the proof and approve it. The portal renders in tiles and assembles the delivery. Your print shop downloads the files.
YouThe portalPrint shop
YouEnter the spec
The portalShow pixels, panels, and price
YouRequest the proof
YouCheck and approve
The portalRender in tiles
The portalPackage the delivery
Print shopDownload and print
Step by step
- Step 1 of 7: You
Enter the spec
You enter the final size, resolution, bleed, panels, and color space as the print shop states them. You also pick the shot.
- Step 2 of 7: The portal
Show pixels, panels, and price
The portal immediately calculates how many pixels and files that makes and shows the price. It warns you if an entry is a poor choice.
- Step 3 of 7: You
Request the proof
Any team member can request the proof. It costs nothing and shows the framing, lighting, and colors.
- Step 4 of 7: You
Check and approve
An owner confirms that the proof has been checked, which places a binding order. The portal records who approved it and when.
- Step 5 of 7: The portal
Render in tiles
The image is rendered in tiles of 2048 pixels per side. The page shows how many tiles are done.
- Step 6 of 7: The portal
Package the delivery
The tiles are assembled into the whole image, which is then split into one file per panel. Everything is available in the portal as a single ZIP file.
- Step 7 of 7: Print shop
Download and print
You give the print shop a link that is valid for 14 days. The print shop downloads the delivery without an account.
Why we render in tiles
A wall-size image is too large to render in one pass. It is built tile by tile, and if a tile fails, only that tile is redone.
How a mega print is made
- Set the wall's dimensions, with resolution, bleed, and panels.
- Check a free proof of exactly this framing and approve it.
- The image is rendered tile by tile and joined without seams.
- You get the print file, one file per panel, with a spec sheet for the print shop.
What does my print shop get?
What you get
You get a ZIP file with one print file per panel, an overview image, and a spec sheet for the delivery.
The print files are TIFF or JPEG, in sRGB, Adobe RGB, or CMYK. In the portal, you can also view the finished image and zoom in.
Delivery as a ZIP file
- Panel 1
- Panel 2
- Panel 3
- Panel 4
- Final size
- Pixels
- Bleed
- Color profile
What the numbers show
One file per panel
Each panel is its own print file with bleed and, if you want them, crop marks.
The overview image
A small image of the whole wall for review and coordination. It is not meant for printing.
The spec sheet
A text file lists the delivery's dimensions, pixels, bleed, panels, and color profile.
The checksums
The print shop uses them to verify that every file arrived complete.
One file or several panels: which should I use when?
Splitting into panels
That depends on how your print shop prints: in one piece, in a fixed grid, or from a roll.
Ask your print shop before you choose. Its spec states the split along with the overlap.
Three cases, by how the print shop prints: one piece becomes a single file, a fixed grid becomes panels in columns and rows, and a roll becomes vertical panels of equal width that overlap.
IfThe print shop prints the wall in one piece
thenOne file
IfThe wall has a fixed number of panels
thenGrid of panels
IfThe print shop prints from a roll
thenBy maximum panel width
| Aspect | One file | Grid of panels | By maximum panel width |
|---|---|---|---|
| When | The print shop prints the wall in one piece | The wall has a fixed number of panels | The print shop prints from a roll |
| What you enter | Nothing else | Columns, rows, and overlap | The maximum panel width and the overlap |
| What you get | One print file | One print file per panel of the grid | As few equal-width panels as possible |
| Limit | The file can get very large | At most 20 columns and 4 rows | At most 20 panels side by side |
| Overlap | Not applicable | Your choice | Your choice |
What do I gain, and where are the limits?
Advantages and limits
You get a file made exactly to spec and see it first, but you don't get a print or a layout.
Advantages
Rendered at final size
The image is rendered at the pixel count the spec calls for. Nobody enlarges a small image.
Framed to your format
The cable is framed to your final size: fully in the image, filling it, or off to one side with room for text.
See it first, then order
The proof is free. Credits are charged only when you approve.
The form warns you
It tells you when the resolution is higher than anyone can see on a wall or when the bleed is missing.
The price is set up front
You see the pixels, files, and price before you request a proof.
Ready for the print shop
One file per panel, with bleed and a spec sheet. Nobody has to slice an image by hand.
Limits
No printing
We deliver the file. You order printing, shipping, and installation from your print shop.
No wall at full size yet
The process is built and has been tested on small sets of tiles. We have not yet computed a full wall this way.
Two camera angles, one cable
You can choose the perspective view or the side view of one cable. Text and logos are set by your agency, or by us in the design service.
The limit is pixels
An image can have at most 1000 megapixels. For a wall, 150 dpi or less is usually enough.
TIFF or JPEG
We don't deliver PDF or PSB. Very large TIFF files are written as BigTIFF.
Generic CMYK only
For CMYK, there is one generic profile. We can add your print shop's profile on request.
The proof doesn't show sharpness
It is 1600 pixels wide and shows the framing, lighting, and colors. It doesn't show how sharp the print will be.
Only owners can order
Any team member can request the proof. At 300 megapixels and up, we also approve the order by hand.
Not the right tool if:
- You want printing and installation of the wall from a single provider.
- You need the whole wall, with text, logo, and layout, as a finished print-ready file.
- Your print shop requires a PDF or a specific CMYK profile, and time is short.
How is this different from enlarging an existing image?
Compared with today
An enlarged image has only the pixels it already had, while here every pixel of the wall is rendered from scratch.
A studio photo is the other option. It requires a sample, and its format has to fit the wall.
A small image stretched to wall size: the cable is made up of coarse blocks. By contrast, the same wall rendered from scratch in tiles: the cable has a smooth edge.
Until now
Enlarged existing image
PixelsAs many as the image already has
At final size
Mega print from the portal
PixelsAs many as the spec calls for
| Aspect | Enlarged existing image | Studio photo | Mega print from the portal |
|---|---|---|---|
| Pixels | As many as the image already has | As many as the camera delivers | As many as the spec calls for |
| Bleed | Missing or mirrored | Has to be in the photo | Rendered with the image |
| Panels | Sliced by hand | Sliced by hand | One file per panel |
| Wall format | The image's aspect ratio | The photo's aspect ratio | The cable is framed to the final size |
| Check beforehand | Only on the finished print | With a test shot | With the free proof |
| Image | Any image you have | Anything you can stage | One cable from two camera angles |
What do I need, and what does it cost?
What you need and what it costs
You need your cable as a 3D model, your print shop's spec, and credits, and the proof is free.
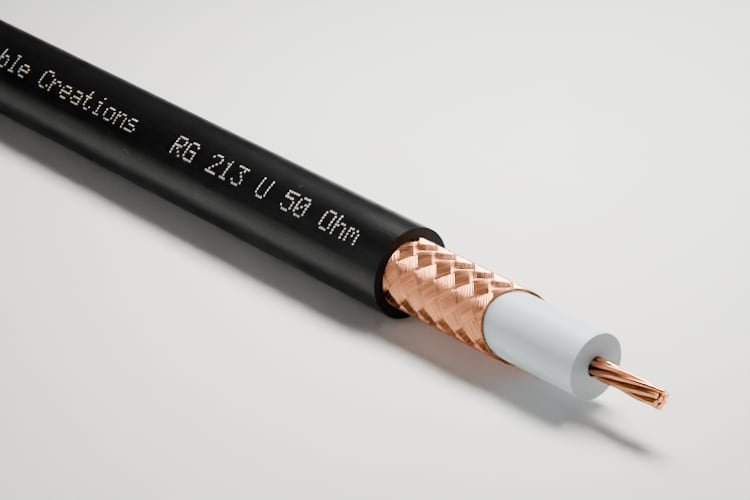
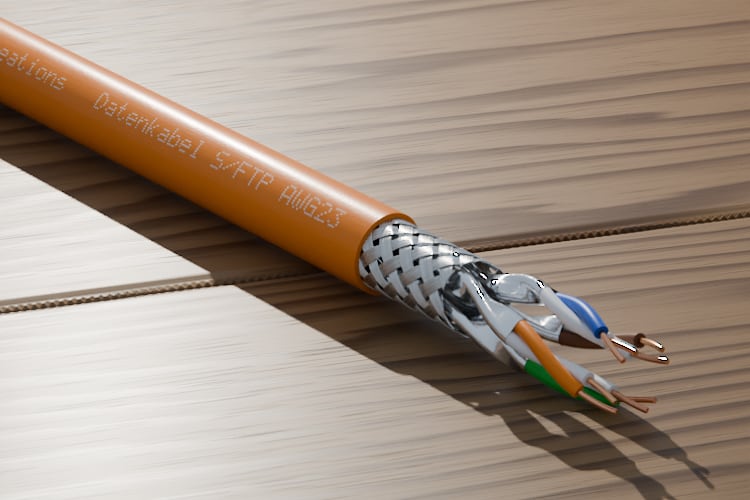
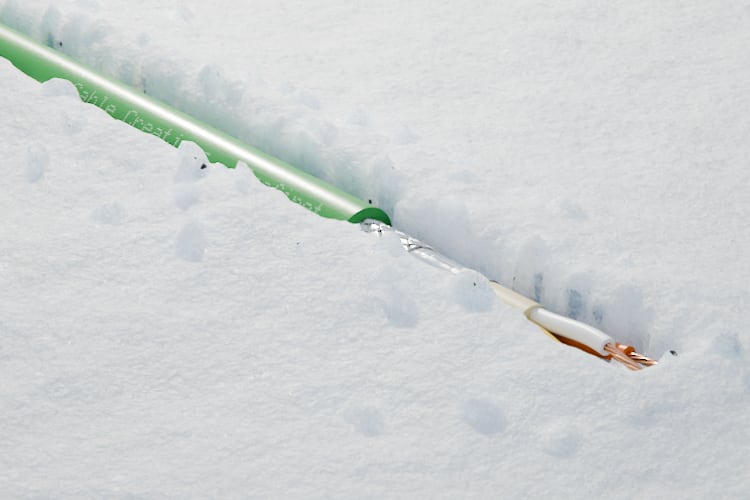
Three real renderings as possible shots: a cable in the photo look on a light backdrop, a cable in daylight on wood, and a cable in daylight in the snow.
- Photo look
- Daylight on wood
- Daylight in the snow


What you need
Your cable in the portal
The cable has to be in the portal as a 3D model. We build it from your construction data.
The print shop's spec
Final size, resolution, bleed, panels, and color space. You can attach the spec to the order as a PDF.
A shot
Perspective or side view, as a cutout, flat, in the photo look, or in daylight on a surface.
An owner to approve
Only an owner on your team can place the binding order. The owner confirms that the proof has been checked.
A print shop
It prints and installs the wall. You also agree on the color profile with them.
What it costs
A mega print costs credits. The price depends on the number of pixels, the look, and the number of panels, and there is a minimum price. The proof is free, and credits are deducted only when you approve.
What else do people ask?
Frequently asked questions
Short answers to the questions people still have before the first mega print.
- How large can an image get?
- The limit is pixels, not wall size. The form calculates the megapixels from the final size and resolution and tells you when there are too many.
- What does the proof cost?
- Nothing. Any team member can request a proof. Credits are charged only for the approved image, at the price shown up front.
- What does the print shop receive?
- A ZIP file with one print file per panel, an overview image, a spec sheet for the delivery, and checksums. You agree on color profiles for printing with your print shop.
- Do you also print the wall?
- No. We deliver the print file. You order printing, shipping, and installation from the print shop of your choice.
- Can I use any shot for the wall?
- No. For the wall, you can choose the perspective view or the side view of one cable. Each is available as a cutout, flat, in the photo look, or in daylight on a surface.
- Can I still cancel after I approve?
- Yes, as long as rendering is still in progress. You get a refund for the tiles not yet rendered, but the base price is still charged. If rendering fails, you get everything back.