
Comparison
Photo or rendering? The honest comparison.
Have a cable photographed, and you get an image of one sample; have it rendered, and you get a model for every image that follows.
Who it's forFor marketing, product management, and sales at a cable manufacturer.
In short
- What each approach needs before there is an image
- What a rendering shows and where it stops
- Both approaches, criterion by criterion
- When a photo is the better choice

A rendering, not a photoCalculated from the cable's 3D model.
What is the difference between a photo and a rendering?
Two approaches to an image
A photo captures a sample placed in front of the camera, while a rendering is calculated from a 3D model of your cable.
Both approaches produce a product image. They differ in what has to be in place first and in what remains after the first image. After a photo, you have an image; after a rendering, you have the model.
Key terms
- Product photo
- A photograph of a manufactured piece of cable, usually taken in a studio. It shows exactly that piece, the way it was prepared.
- Sample
- The piece of cable that gets photographed. To show the inside, it is stripped by hand, revealing one layer after another.
- Construction data
- The specifications your cable is built from: conductor, insulation, shield, jacket, diameters, colors, and print. They are usually in the datasheet.
- 3D model
- Your cable as a dimensionally accurate model in the computer, built from the construction data. Each layer exists in it as a separate part.
- Rendering
- An image calculated from the 3D model, with light, shadow, and materials. It is neither photographed nor generated by AI.
How is a photo made, and how is a rendering made?
How each image is made
A photo requires a sample in front of the camera, and a rendering requires data turned into a model.
A photo starts with a manufactured piece. Someone strips it, positions it, lights it, and shoots it. Then the image is cut out and retouched.
A rendering starts with your data. The steps below show that process and who does what.
Two paths, one above the other. To a photo: make a sample, strip it by hand, light and shoot it, cut out and retouch, ending in one photo. To a rendering: send data, build the model, accept the model, order an image, render the image, ending in a rendering plus the model for every additional image.
The path to a photo
YouMake a sample
The photo studioStrip it by hand
The photo studioLight and shoot
The photo studioCut out and retouch
One photo
Next cable: a new sample. Next image: a new shoot.
The path to a rendering
YouSend the data
Cable CreationsBuild the model
YouAccept the model
YouOrder an image
Cable CreationsRender the image
A rendering and the model
Next cable: a new model. Next image: just an order.
Step by step
- Step 1 of 5: You
Send the data
You upload the datasheet or describe the cable in the portal. We don't need a sample for that.
- Step 2 of 5: Cable Creations
Build the model
We build the 3D model from the data: conductor, insulation, shield, jacket, and print. This happens once per cable.
- Step 3 of 5: You
Accept the model
You check the model in an image and mark anything that is wrong. The cable is approved only once you accept the model.
- Step 4 of 5: You
Order an image
You choose the shot, scene, image size, and format. You see the price in credits before you order.
- Step 5 of 5: Cable Creations
Render the image
The portal calculates the image from the model and saves it to your media library. For the next image, all it takes is a new order.
More on this How construction data becomes an image →
What do you see in a rendering?
What a rendering shows
A rendering shows the construction just as the data specifies it, with each layer separate and cleanly stepped.
The image below is a rendering, not a photo. With a sample, the same view depends on how well the layers can be stripped back by hand.
A rendered data cable, stripped toward the end: orange jacket, braided shield, foil around the pairs, and colored conductors. Five numbered markers point to the jacket edge, the braid, the foil, the conductors, and the plain light background.

What the numbers show
A clean jacket edge
The jacket ends in a straight cut. On a sample, the edge depends on the knife and the hand.
The braid, wire by wire
Every wire of the shield is in its place. A real braid frays easily when the cable is stripped.
The foil around each pair
The foil is opened just enough to make it recognizable. On a sample, it tears or slips easily.
The conductors in their colors
The number, colors, and twist of the conductors come from the data. That is why they match the datasheet.
Light and background
Lighting and background are fixed settings, and such a setting is called a look. The next cable is shown in exactly the same light.
Which approach should I use when?
Which approach fits when
A photo suits a single cable and a real location, while a rendering suits a whole lineup and the inside of the cable.
The two approaches aren't mutually exclusive. If you maintain a catalog and case studies, you often need both: consistent product images and individual photos from the field.
Three cases, each with the approach it leads to. A single cable with a sample on hand: the photo. A whole lineup shown consistently: the rendering. A consistent catalog and a case study from the field: both together.
Ifthe job is a single cable and the sample is already on hand.
thenPhoto
Ifa whole lineup has to look consistent.
thenRendering
Ifthe catalog has to be consistent and a case study shows the cable in use.
thenBoth together
| Question | Photo | Rendering | Both together |
|---|---|---|---|
| Best when | the job is a single cable and the sample is already on hand. | a whole lineup has to look consistent. | the catalog has to be consistent and a case study shows the cable in use. |
| Shows best | The cable in a real location, with people and machinery. | The construction: each layer separate, stepped, or pulled apart. | The construction in the catalog, the application in the case study. |
| Required | A sample, plus a studio or the location. | The construction data, ideally as a datasheet. | The data for all cables, and a sample only for the photo. |
| If the cable changes | A new sample and a new shoot. | A change to the model, then new images. | The product images follow the model, while the photo remains a record of its time. |
| Typical example | An image for a trade article about a project. | Product images for the catalog, website, and datasheet. | A catalog of renderings and a photo series from the job site. |
Where is the rendering ahead of the photo, and where is the photo ahead?
Where the rendering wins and where the photo does
A rendering is strong where construction, consistency, and repeatability matter, and it reaches its limit at real locations.
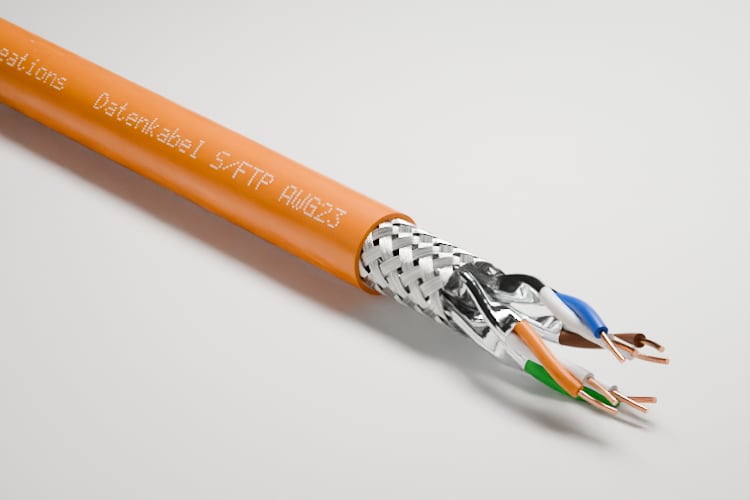
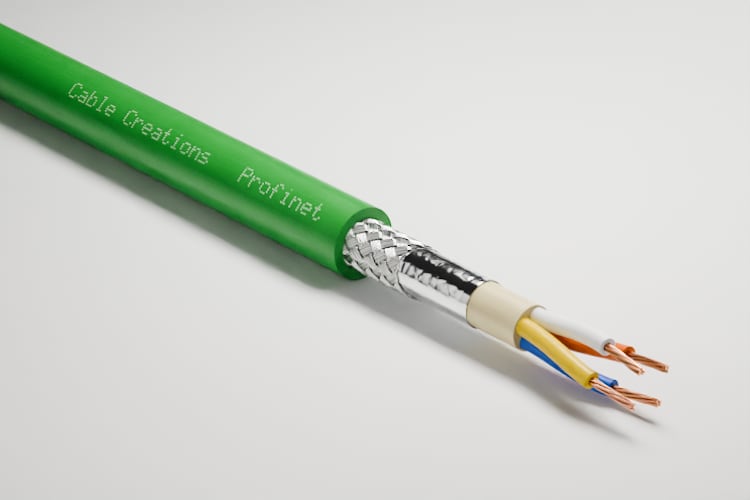
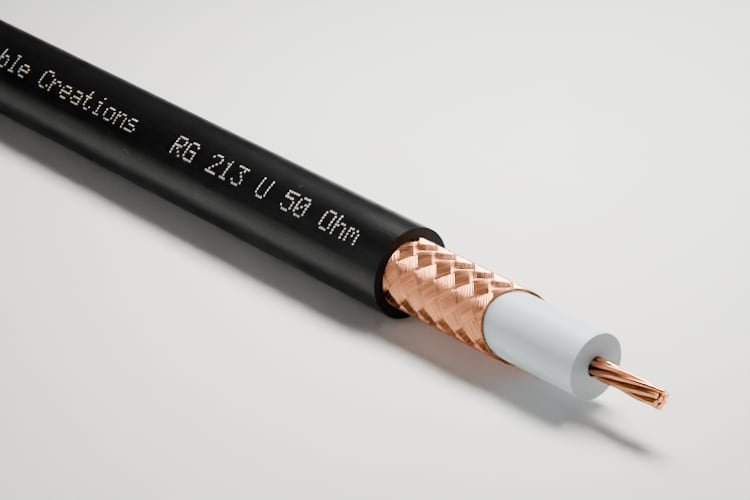
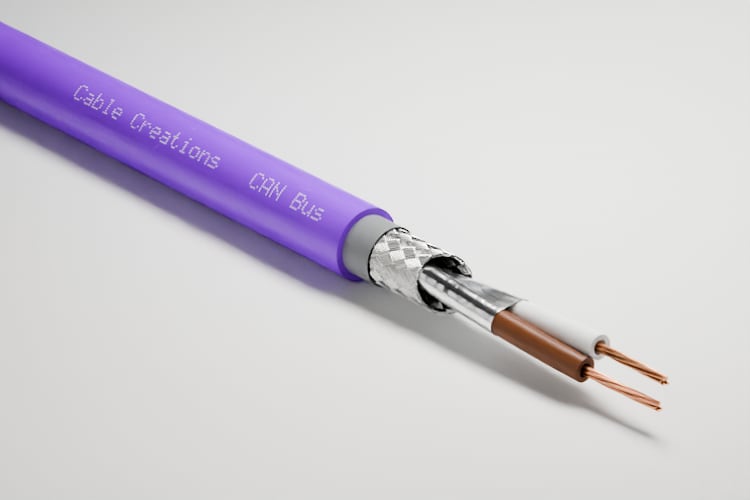
The four images show four different cables in the same light and from the same angle. None of them comes from a studio.
Four renderings, each showing a different cable: a data cable, a PROFINET cable, a coaxial cable, and a CAN bus cable. All lie at the same angle, in the same light, on the same light background.
Four cables, one light, one angle
- Data cable
- PROFINET cable
- Coaxial cable
- CAN bus cable


Advantages
The inside becomes visible
Each layer can be revealed, stepped, or pulled apart individually. Nothing frays, and nothing slips.
A lineup that looks like one family
Fixed looks and views apply to every cable. A coaxial cable and a data cable are shown in the same light.
No sample needed
The data is enough. That means you can get an image even of a cable that has not been manufactured yet.
A change needs no new setup
If the print changes, the portal marks the affected images as outdated. You render them again with one click.
More images from the same model
A different view, image size, or look is just another order. The model stays the same.
Limits
First the model, then the image
Before the first rendering, the model is built and you accept it. A photo of an existing sample can be ready sooner.
It shows the design, not the piece
A rendering shows the cable as designed. Only a photo documents a manufactured piece, marks and all.
No real location, no people
Surfaces such as concrete, wood, or grass are available as a scene. We don't render a job site, a machine, or people.
Colors follow the values
The model takes its color values from the data you provide. If a shade has to match exactly, a sample helps for comparison.
Not the right tool if:
- You want to show a cable in use: installed, connected, with people and machinery.
- You need just one image, the sample is on hand, and you need the image right away.
- You have to document a manufactured piece, for example for a test or a complaint.
How do the two approaches compare, criterion by criterion?
Photo and rendering compared
The photo wins for a quick single image and a real location, and the rendering wins for anything that repeats.
The drawing shows the case that separates the two approaches most clearly: the print changes. The table below lists all criteria, including those where the photo is ahead.
The same case twice: the cable's print changes. With a photo: make a new sample, strip it by hand, light it and shoot it, then the new image. With a rendering: the new text on the model, one click on the outdated images, and all images are new.
New print, photographed
Photo
A correctionA new sample and a new photo, or retouching.
New print, rendered
Rendering
A correctionA change to the model, then new images.
| Criterion | Photo | Rendering |
|---|---|---|
| Possible without a sample | No. Without a manufactured piece, there is no photo. | Yes. The construction data is enough. |
| Showing the inside | As well as the sample can be stripped back by hand. | Each layer separate, stepped, or pulled apart. |
| A consistent lineup | Only with the same setup, lighting, and angle for every photo. | Fixed looks and views apply to every cable. |
| A correction | A new sample and a new photo, or retouching. | A change to the model, then new images. |
| More views later | A new setup, provided the sample and lighting are still the same. | One order from the same model. |
| A quick first image | Yes, as soon as the sample and camera are ready. | Only after the model is built and accepted. |
| The cable on location | Yes. Job sites, machines, and people are a job for photography. | No. Surfaces are available as a scene, but not a real location. |
| Documenting the actual piece | Yes. The photo shows exactly that piece. | No. The rendering shows the design. |
| What drives the cost | Every photo: sample, preparation, studio, and post-production. | The model once per cable, then each image you order. |
What do I need instead of a sample and a studio, and what does it cost?
What you need instead of a sample and a studio
Instead of a sample, you need the datasheet; instead of a shoot day, an acceptance of the model.
What you need
The datasheet instead of a sample
The construction data is enough, most easily as a datasheet. If something is missing, we ask in the order.
The print as text
On a sample, the print is already there. For the model, we need its exact wording and set it character by character.
An acceptance instead of a shoot day
You accept the model before the first image. That should be done by someone who can judge the construction.
A sample only for the color
We don't need a piece of cable or a studio. At most, a sample helps when a color has to be matched exactly.
What it costs
The model is built once per cable through the cable order. Every additional image is an order paid in credits, and you see the price beforehand. A small preview is free.
What else do people ask?
Frequently asked questions
Short answers to the questions people still have when comparing the two.
- Can you tell that a rendering isn't a photo?
- With the photo look, light, shadow, and materials are calculated the way a studio would set them. Every image on this page is a rendering, so judge for yourself.
- Do you need a sample for a rendering?
- No. The construction data is enough. At most, a sample helps with matching colors.
- Can I use photos and renderings side by side?
- Yes. The rendering shows the construction, and the photo shows the cable in use. You order renderings in the portal, and your photographer takes photos as before.
- How long does it take to get the first rendering?
- That depends on the model, which is built once and accepted by you. After that, an image is in your media library shortly after you order it.
- What if the cable changes after the first image?
- You request the change on the cable's page. If the print changes, the portal marks the affected images as outdated, and you render them again.